Showing posts with label recycling. Show all posts

Monday, January 28, 2013

A Chicken Walks Into a Bar...

The other day my neighbor friend called and suggested we leave the children with our spouses and go out for an evening of margaritas and drunken clearance shoe shopping at Von Maur.  Obviously, I was all over that plan.  We had a fabulous time not only trying on shoes, but also sampling ridiculously-priced perfumes and later stalking the clearance end-caps of Target.  What can I say...we are who we are.

She also took me to her her favorite little vintage resale shop, where I found the most fabulous treasure.

At $5.99, who could resist?

I had never seen such a thing, but it was love at first sight.  No idea why.  Up until that day I would have told you chickens are not my thing.  But one look into his beady little black eyes and I was a goner.

I brought him home and gave him a little chicken-makeover, and now he is perched happily on my desk.

Meet Crochet Chicken!
He makes a fabulous crochet caddy.  My most favorite hook sizes fit perfectly in the tail slots, along with some fun scissors   The front pouch is just right for stitch markers.  We were meant to be together.

A quick internet search tells me these kitchen chickens were all the rage in the 1950's, and the little pocket in front is a ring holder!   So clever.  I have no idea why the measuring spoons he came with are classic 1970's-era.  I wonder if he originally had a set of spoons, or if these were sold for you to add your own.  Not that it matters because he's much cuter this way anyhow.

Monday, October 1, 2012

It's a Bird! It's a Plane! It's a retro tablecloth refashioned into purse!


Browsing through Goodwill last week, I found this lovely, lovely 1960's era tablecloth in a golden yellow.


Best $1.69 I've spent in a long time.  It's got a wonderful thick texture to it, and it just begged to be something more than a tablecloth.

So it was up-cycled into a vintage-inspired bag designed by the lovely Long Ladies at Marie-Madeline Studio.  If you're not familiar with their designs, check them out.  They create patterns for wonderful skirts, dresses and accessories, and they use delicious color combinations.  Very inspiring stuff indeed.  This particular bag is called the Laraine.  


I followed the pattern exactly with the exception of one small additional zippered pocket tucked into the back lining.  Without it the band-aids and Tylenol and chapstick roll around everywhere and nobody wants that.  :-)  Oh, and I divided the other pocket panel into 3 pockets, instead of the 2 the pattern called for.  It fit my iPhone and sunglasses better that way.  

Show and tell time.

Roomy interior

3 open pockets on one side; small zipper pocket on the other.

My Mother made one too.  Hers is out of airplane seat fabric she found at an aircraft supply store.
It's practically indestructible. 
It holds an amazing amount of crap, despite it's deceptively small size.


Which reminds me of something...


Tuesday, October 4, 2011

Speaking of Retro Awesomeness...

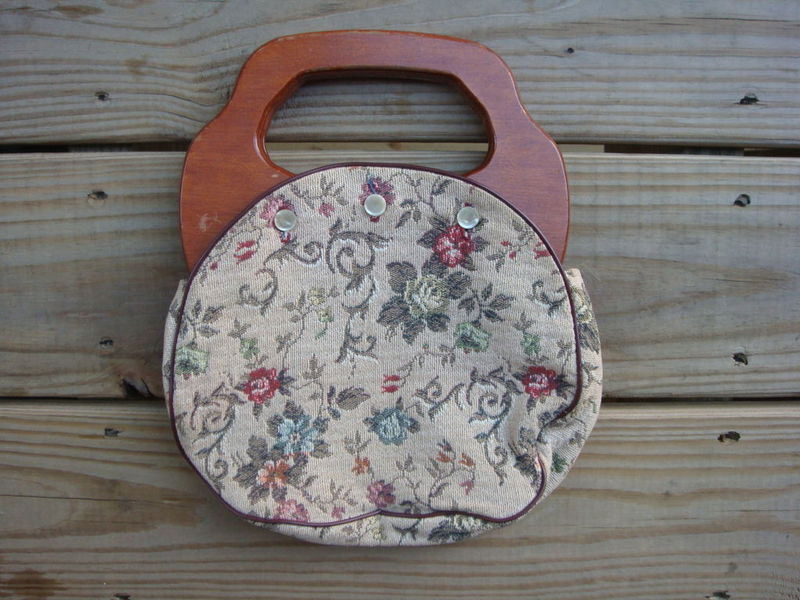
Hopefully I'm not dating myself too much here, but back when I was a kid every woman had a bag with wooden handles and a cover attached with buttons.  They were all the rage, at least amongst the Church Ladies, which was the extent of my exposure to fashions of the time.  I'm not sure of the exact era.  Late 70's; early '80's.  They were called Bermuda Bags (which I only discovered after scouring eBay for said wooden handles and searching all derivatives of "purse with wood handles/buttons/removable covers").

Look familiar?  I yanked a couple photos of vintage Bermuda bags from eBay to jog your memory:


Remember now?  Ok, so I love the look and the idea of these bags with interchangeable covers, but I don't particularly love the fabrics.  Somebody spent hours and hours creating these back in the day and while I appreciate their effort - it's just not my look.  I wanted to do the same thing, but with a more modern twist.

Here's my version:


The handle is not the traditional wood, but is vintage Lucite (fancy plastic), and the design is really quite clever because the handles lock together at the top closing the whole thing securely.  The handles were an eBay find, and they came with two covers.  I'm sorry to say I threw them away almost immediately so I can't show you.  One was tan with embroidered mushrooms on it (maybe I could have resold that one because it was oh-so-vintage) and the other cover was navy blue with red piping.  Yikes, man. 

Check out the way these handles work!  Somehow two layers of lining are attached to the handles, with buttons on the outside for covers.


I made my cover completely reversible, with no exposed seams.  Let me tell you, it was crazy tricky!   But now that I've done it once and drafted the pattern, I'm sure I can do it again.  This will be the best-dressed handbag west of the Mississippi.  It might also be the only dressed handbag west of the Mississippi, but it takes time to resurrect awesome vintage ideas such as this.  At least that's what I tell myself.  It's better than admitting I'm a dork stuck in a time bubble.


The orange/blue fabric is from a 2009 line by Riley Blake, called Wheels by My Minds Eye.    The floral is intended to look vintage, yet feel modern.  It's is part of the Pretty Bird line designed by Pillow & Maxfield for Michael Miller Fabrics.

Stay tuned, because now I've got all sorts of other ideas for bag covers, including a crocheted and felted one that looks like a giant pink rose.  Betcha can't wait.  :-)

Monday, June 20, 2011

Dueling Sewing Machines

Ever since my daughter's sick day almost one month ago, there have been issues with the sewing machine.  Scheduling issues.  She is obsessed.  So much so, that we are going to borrow one of my Mother's machines (yes, she has several just in case someone wants to learn to sew or needs a backup) to get us through the remaining two months of summer break.  Or maybe beyond, depending on if sewing loses it's luster or not.

My daughter picked out this pillow pet pattern and has been crafting animals at lightning speed.  She made just about every animal in the original pattern, and then started drafting her own (the caterpillar is her original).  She has plans in the works for designed-by-her butterfly and spider, but those guys are on hold until we can get to JoAnn's for more supplies.   


Yesterday, I gave up begging and pleading for sewing machine time and busted out the serger instead.  It was kind of nice, stitching side by side with my offspring and chattering about stuff.   That day resulted in new frocks for us both.

The t-shirt knit purple sheet became a summer maxi dress.  To make your own, find a dress that fits you good and turn it wrong side out.  Trace around the bodice part, waist, and hips on to tracing paper.  Add 1" for seam allowance.  Fold your sheet (or fabric) in half and cut out two; one front and one back.  Unfold them and pin side seams right sides together.  Use the serger to sew both side seams.  Cut a couple of 2" wide pieces from your fabric scraps and use them to bind the edges of both sleeves and the neck. 


Below is a better picture of that binding step.  (ignore my arm as I self-portrait once again ;-) ) I left the edges raw on mine, because I like that look with knits.  They could be folded under if you like a more finished edge.  To tighen up the armholes a bit, I ran a piece of elastic cording (like for beading projects) inside that armhole casing by threading it with a large-eyed needle, and tying a knot when the elastic felt about right.  Hem the bottom with a quick serge around the edge.  Fold it up and stitch if you want.


The other serger project from yesterday is the Upcycled Grow-With-Me Dress.  I just named it that right this very second.   This idea takes that old tank top from last year that is now waaaayyy too short and modifies it into a maxi dress.


We started with a reversible tank top (stripes on one side, flowers on the other) in primarily oranges and blues.  The skirt was made entirely of stash fabrics in those shades.  The width of the stripes is completely random - I just cut the maximum width I could with the bits of fabric available.


My daughter's waist is 23", so the first tier is about twice that: 40" more or less.  Sew the strips into a tube with the serger and make a ruffle at one long edge (wrestle your offspring for control of the regular sewing machine to make the ruffle) Adjust the ruffle until it's the same width as the tank top.  Cut the hemmed edge off the tank top, and pin your ruffle to it.  Serge.

Repeat with all the tiers, making each tier longer than the one prior for maximum twirlage (is that a real word?)

 
And the best part?  Next summer, when this dress is too short, all I have to do is add another tier.  Theoretically she could be wearing this thing for the next 4-5 summers.

Monday, May 2, 2011

Holy Sheet!

Every year around September, Target does an awesome clearance sale of sheets.  The ones they market for college students with the dorm setup/organization stuff.   Get your red pen and circle August 15 on your calendar.  Make a note to start stalking the clearance endcaps like the crazy crafting psycho you are.  Seriously.  Circle it.  Right now.

Good job. 

Mostly they have twin-sized sets, but that is still ample fabric yardage to make into all sorts of wonderful things.

Last Fall's sheet clearance set me up with a wonderful cotton t-shirt set in plum, with hot pink stripes and a few threads of silver glitter.  I also snagged a woven set in white with several shades of purple and pink stripes.   I paid $8 total for both sets of sheets. 

Add in a little inspiration....


Part of the knit sheets were sewn into this ultra-comfortable wrap dress.  The pattern is called Hope, and is a free download from Burda.  I still have the entire fitted sheet and pillowcase to make into something else.  Maybe a sleeveless summer sundress?  Sleep shorts?  A t-shirt?


The striped fitted sheet became these pajama pants.  They're incredibly comfortable because they feel like wonderfuly soft....sheets!   This pattern is in Betz White's book, Sewing Green.  It's full of ideas for recycling and repurposing old sweaters, sheets, and other things into clothes and accessories.


The flat sheet became a sample of Butterick 5181.  I have some expensive designer fabric that is begging to become a dress, but before hacking into it I wanted to make sure the dress pattern would actually fit.  Nothing is more frustrating than spending hours on something that is unwearable.  It's a good thing I did, too, because the bodice absolutely does not work for my body type (which is why I had to add that little butterfly-ish thingie to keep it from gaping open).  Now I know, and I can modify the pattern before cutting into that expensive fabric.  I'm only out a couple of bucks by using the sheet, and I still have a dress to wear around the house.

Fabric can be expensive, but if you keep your eyes open to other ideas, you can find large quantities of fabric in unexpected places.  Think shower curtains, tableclothes, sheets from your linen closet that have holes or stains.  The linens rack at Goodwill often has delightful vintage sheets and tableclothes.  Repurpose them!

Sunday, April 17, 2011

T-Shirt Recycling

Ruffles are on everything this spring.  It seems like every major fashion designer has gone ruffle-crazy.  This is good because I love girly clothes, but bad because I covet every ruffled cardigan I see. 

Guess what?

I found a solution that's much easier on the ol' bank account.

Step 1: Find an old t-shirt.  This one has been in the back of my closet for a couple of years.  I rarely wore it because it just didn't fit quite right.

Step 2: I forgot to take pictures of this step - sorry!  Neatly cut off the bottom hem.  Then cut off the bottom 6 inches of your shirt.  Cut the 6 inch piece in half, and in half again, so you have 4 strips that are 1.5 inches wide.  Cut one side seam of each so they are flat pieces, not a tube. 

Step 3: line up the shoulder and edge seams of your shirt, with the front centered.  Draw a curved line from the bottom up to the collar.  Cut on this line, totally removing the collar and opening up the front.


Step 4: Lay out your shirt and make sure it's symetrical.  Trim more if necessary.


Step 5: Sew 3 of the 1.5" strips together, forming a large circle.  If you have a serger, run one edge of this through and hold back while you feed it through so it makes a ruffle.  You can also do this with a regular sewing machine on a zig-zag stitch over the edge.  I only had two cones of red thread for the serger, so I put black through the needles.  It made a cool unplanned accent with the black stripe. 

Step 6:  Pin the ruffle around your shirt, right sides together and raw edges aligning.   Sew around the whole thing with a 1/4" seam allowance.  (Adjust if necessary: if your shirt is larger than the ruffled piece, trim a bit more off the curved front.  If the ruffle is too long, ease it in or shorten it a bit.)

 Step 7:  Topstitch 1/8" from where the ruffle meets the shirt, making sure to catch the raw edges on the backside.  This will keep the ruffle from folding back as well as keeping the raw edges flat.
 
Step 8: Cut the remaining 1.5" strip in half, and sew the short edges together making two small circles.  Ruffle one edge of the circles as you did for the large ruffle.  Cut the hemmed part off the two sleeves, attach the small ruffled circles right sides together, sew, and topstitch as you did before.


Step 9: The perfect sundress topper!  You could add a button or hook to the front if you want.  I can't decide if I should use a black or red button on mine.


 If you make one one of these I would love to see.  Click the email me link at left and send a picture!