Tuesday, October 25, 2011

The Fred Rogers Cardigan

Hello neighbor.

Mr. Rogers has a special place in my heart.  I grew up watching him on TV.  He was kind, he never got his feathers ruffled over un-neighborly behavior, and he took his viewing audience on wonderful field trips to see how stuff was made. 

Reruns were still on TV when my daughter was born.  When she was old enough, I excitedly introduced her to the Neighborhood of Make Believe and all the other wonderful characters in the 'hood.  She didn't care.  She actually thought it was kind of slow-paced and boring.

Whatever.  Kids these days don't know what's cool.

It's getting cold here, so I've been thinking sweaters. 


This cardi began as the Japanais Tunic by Amy Swenson.  Beyond the basic stitch pattern, it doesn't really resemble her original much anymore.  I added extra rows to make it longer, changed it from pullover style to zippered cardigan, and re-worked the neckline to make it fit me more snugly.


I like how the stitches go from dense to mesh 2/3 of the way down.  Gives it nice detail.


The next sweater is already underway.  I'm happily hooking along on the Circular Motion Pullover, a freebie from the Lion Brand Yarn website.  It was originally designed for men, but I'm using a lighter weight yarn and smaller hook to make it woman-sized.  Hopefully.  :-) 

No-Mess Pumpkins

Love Halloween but hate the mess of carving pumpkins?  I hear ya.  Carving jack-o-lanterns always starts out like a good idea, but after ten five two minutes the novelty wears off and I am the one left scooping icky sticky pumpkin guts. 


These guys aren't exactly jack-o-lanterns, but they were a million times more fun to do than carving pumpkins.  Between do-dads from the sewing cabinet and my husbands leftover hardware bits in the garage, the kids had plenty of inspiration. 

And these pumpkins will last a whole lot longer than two days, unlike their carved counterparts.

This idea is courtesy of Family Fun magazine

Wednesday, October 12, 2011

Upgrades

After carrying the super-awesome bermuda bag around for a week, I figured out that not having a shoulder strap makes me positively batty.    Here you go my friends, the 10-minute solution for adding a strap to an already completed bag:


Mitten clips!  Ingenious invention they are. 

One note about mitten clips: make sure they are the newer kind with a layer of squashy rubbery stuff.  This holds them tight to your fabric without damaging it.  Mitten clips used to be two pieces of metal claws with "teeth."  That kind will slip and slide on your bag, and will eventually wear holes in the fabric.

Tuesday, October 4, 2011

Speaking of Retro Awesomeness...

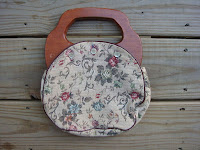
Hopefully I'm not dating myself too much here, but back when I was a kid every woman had a bag with wooden handles and a cover attached with buttons.  They were all the rage, at least amongst the Church Ladies, which was the extent of my exposure to fashions of the time.  I'm not sure of the exact era.  Late 70's; early '80's.  They were called Bermuda Bags (which I only discovered after scouring eBay for said wooden handles and searching all derivatives of "purse with wood handles/buttons/removable covers").

Look familiar?  I yanked a couple photos of vintage Bermuda bags from eBay to jog your memory:


Remember now?  Ok, so I love the look and the idea of these bags with interchangeable covers, but I don't particularly love the fabrics.  Somebody spent hours and hours creating these back in the day and while I appreciate their effort - it's just not my look.  I wanted to do the same thing, but with a more modern twist.

Here's my version:


The handle is not the traditional wood, but is vintage Lucite (fancy plastic), and the design is really quite clever because the handles lock together at the top closing the whole thing securely.  The handles were an eBay find, and they came with two covers.  I'm sorry to say I threw them away almost immediately so I can't show you.  One was tan with embroidered mushrooms on it (maybe I could have resold that one because it was oh-so-vintage) and the other cover was navy blue with red piping.  Yikes, man. 

Check out the way these handles work!  Somehow two layers of lining are attached to the handles, with buttons on the outside for covers.


I made my cover completely reversible, with no exposed seams.  Let me tell you, it was crazy tricky!   But now that I've done it once and drafted the pattern, I'm sure I can do it again.  This will be the best-dressed handbag west of the Mississippi.  It might also be the only dressed handbag west of the Mississippi, but it takes time to resurrect awesome vintage ideas such as this.  At least that's what I tell myself.  It's better than admitting I'm a dork stuck in a time bubble.


The orange/blue fabric is from a 2009 line by Riley Blake, called Wheels by My Minds Eye.    The floral is intended to look vintage, yet feel modern.  It's is part of the Pretty Bird line designed by Pillow & Maxfield for Michael Miller Fabrics.

Stay tuned, because now I've got all sorts of other ideas for bag covers, including a crocheted and felted one that looks like a giant pink rose.  Betcha can't wait.  :-)

Monday, October 3, 2011

Bringing Back Retro, Baby

There's something about the 1960's that appeals to me.  The fabrics, the fashion....Women in their house dresses and aprons.  Men in suits and hats.  Children washed up and combed for dinner.  Everybody was fancy. 

On Saturday I found some delightful fabric that totally encompasses the 1960's housewife.  It's by Johansen Newman for Elizabeths' Studio, but I don't know what the actual design is called.  It's a black background with seven different housewives in separate window panels, all doing their daily chores. 


They're so sweet!  They look like they live to vacuum and bake and set up tea service, with a charming smile all the way.

At Target I found 4-packs of flour sack kitchen towels for $3.99.  Flour sack towels are amazingly absorbent.  Love 'em.  Then I used double sided fusible web and a super-quick satin stitch edging to applique a housewife to each towel. 

Theses lovely ladies bring such cheer to my kitchen!  I wish I looked half as good doing my daily chores.

Sunday, October 2, 2011

Q - What Did Harry Potter Say to Hedwig?

A - Owl See You Later!

My 8-year-old is obsessed with Harry Potter.  She saw the first movie on July 4th, and between then and now she watched all the movies and has read almost all the books.  She has about 1/4" left in the very last book, so by the time you read this post it will probably be finished. 

Obviously, it was a given she would choose a Harry Potter character for her Halloween costume.

It was a tough choice, because she didn't really want to be any of the main characters because that's what all the other kids at school would probably be, and my daughter is nothing if not different from the masses.  Her favorite teacher from the story is Professor McGonagal, but she wasn't quite sure how to pull that off convincingly.  And so we pondered.....

....and one day I was wandering in JoAnn's and saw a free project sheet for a felt owl costume!  Clearly, this owl could be Hedwig!

[if you aren't familiar, Hedwig is Harry Potter's messenger owl, which is how most people communicate in the wizarding world.  It has always struck me as odd, though, that those who possess such amazing magical skills as Transfiguration (turning a person into an animal, for example) can't figure out a more efficient way to talk, like telepathy or something.  But that would probably make for a very boring movie, with people just standing around and staring at each other for two hours.  Anyway....]

Today, with a wave of my magical sewing machine needle, my daughter became Hedwig, the messenger owl.


I made a few changes to the pattern for stability.  They say this is no-sew.  What that really means is glue-the-snot-out-of-it.  In my opinion that might hold up for one night of trick-or-treating, but it certainly wouldn't make it through a classroom Halloween party, a costume parade, trick-or-treating, and a crazy amount of running and flapping through the yard while hooting and trying to nip your little brother who is pretending to be a rat. (They did this for quite some time today.  Really.)

And that is why we sewed this one together.  It isn't as hard as it looks, because the feathers are stitched on in long strips.  It takes longer to cut the feathers and lay them out than to actually sew them on.  Plus, it's cheaper than store bought because we got all the felt on sale so it came to just under $10.

Oh, and we changed the colors because Hedwig is a Snowy Owl.

All we need to do now is roll up a piece of parchment and tie it to her leg.  She wouldn't be a messenger owl without a letter waiting for delivery.

Happy Halloween, a few weeks early.  :-)